
Note: Before we get into the business of baking, we’d like to clarify that when Richard Hart refers to a Danny Lievito – sometimes just Danny – in this recipe, he’s talking about a lievito madre, or an Italian sourdough starter. So when you see instructions like “feed Danny three times a week” or “let Danny bob around like an apple in a tub of water at a Halloween party”, he’s referring to your sourdough starter.
Take it away, Richard (and Danny).
Makes one 900g loaf
Panettone part 1: first dough
In Three Danny Lievito Feeds (below), I advise you to scale and refrigerate all your ingredients for the first and second doughs after the first feeding. Before you start mixing, make sure that everything you’ve scaled out is chilled, so you can keep an eye on the dough as it mixes.
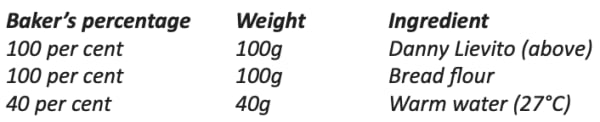
First dough

Additional ingredient
– Neutral oil (enough to coat the inside of the proofing container)
– About 15 to 20 minutes before you start mixing, take the butter out of the fridge so it’s room temperature and pliable by mixing time, which helps it incorporate into the dough before the mass overheats.
Timing
A total of about 30 minutes mixing time, plus 12 hours proofing.
Equipment
Stand mixer fitted with the dough hook, proofing container (large enough to hold dough as it triples in size), marker, masking tape, electric bread proofer (or other means of keeping dough warm), sheet pan.
Mix the dough: In a stand mixer fitted with the dough hook, combine the flour, water, and Danny and mix on low speed until it just comes together. Increase the speed to medium, then mix for about 10 minutes. Don’t shortcut this step because you think the dough looks well combined. Test the strength of your dough: give it a light tug. You should encounter really strong resistance, like chewing gum that you’ve chewed all day. If it’s not feeling that strong, mix it more, up to 5 minutes longer, and test it again.
The dough does not need to look super smooth before the sugar goes in. It just needs to be very strong.
Add half the sugar and continue to mix on medium speed until the sugar is dissolved and you can no longer feel the sugar crystals when you rub the dough between your fingertips. Add the rest of the sugar and continue to mix until you can again no longer feel the sugar crystals.
Add half the butter and continue to mix until it is almost incorporated. Then add the remaining butter and continue to mix until it is completely incorporated, meaning you can’t see or feel any lumps of butter in the dough.
Decrease the mixer speed to low to avoid splashing and add half the yolks. Once they have begun to mix in, increase the speed to medium and mix until the yolks are incorporated. Decrease the speed to low again, add the rest of the yolks, and continue to mix until the dough is completely smooth and homogenous.
The dough should take about 30 minutes total to mix.
Oil the inside of the proofing container and transfer the dough into it. Use a marker and tape to mark the top of the dough on the outside of the container. Then, use your best visual estimate (or a ruler if you like) to mark subsequent levels that would indicate a tripling in volume.
Place the container inside an electric bread proofer and set the temperature to 27°C. Let the dough ferment and rise for 12 hours. Note that this dough does most of its rising in the last few hours, so don’t make yourself crazy checking it every hour at first, because you won’t see much change until about hour 8. (See opposite for troubleshooting.)
Note: If you haven’t already made the Citrus Paste (below), now would be a good time to do that.
After the dough has tripled in volume, transfer it to a sheet pan and flatten it out a bit so that it can cool quickly, which will stop it from overfermenting in the moment and keep it from overheating in the next mix. Transfer it to the fridge, but don’t let it cool down too much or the butter in the dough will cause it to solidify. Once the dough has cooled to 18°C, which should take about 30 minutes, you can start to mix the second dough (see below).
Panettone part 2: second dough
Some words of reassurance and hope as you prepare to mix the second dough: This is the phase when “panxiety” typically hits. To the chilled first dough, which is already full of butter, eggs, and sugar, you’re going to add a little flour, a lot more butter, sugar, and egg yolks, and then, so much fruit. You’re going to ask yourself, “Does this much fat and sugar and fruit make sense? Can I put all this stuff into a bread and have it work?” I am here to tell you it can work.
Which is not to say that it isn’t a finicky process, because as you surely know by now, it is.
If the second dough gets too warm, it will break (in England, we say “split”) like an overheated hollandaise, and once that happens, it is fucked: game over. The best way to keep the dough cool and intact is to store all the ingredients, except for the butter, in the refrigerator until just before adding them to the dough.
Now, you may also look at the quantity and variety of highly acidic citrus fruits—candied, zested, juiced, pureed—being added to this thing, and you would be right to ask: “Isn’t all of this acid threatening the balance of the dough?” It’s true that it would be a lot easier to maintain the dough’s structural integrity by dialing back the citrus, but I feel that the flavor payoff is worth the risk.
One more note about the fruit: please wash your raisins in warm water, agitate them slightly, then drain them. Repeat this a few times until the water runs clear. You’ll be amazed (and probably a little disgusted) by all the dust, wax, debris, and maybe even a few tiny insects that have been hiding in those crevices. Once you’ve done that, transfer the raisins to a towel-lined sheet pan to dry overnight.
Rest the dough
Let it rest in the mixer bowl, covered with a tea towel, for 1 hour.
Preshape and rest the dough: Transfer the dough to a clean work surface and preshape it into a round. Let the preshaped dough rest, uncovered, for 1 hour, until it has relaxed and formed a skin.
Final shape: Skewer the panettone mold with 2 parallel wooden skewers, about 3 inches apart, as close to the base of the mold as possible.
Give the dough a final shape into a round and gently transfer it, seam side down, to the panettone mold.
Final proof: Now you have two options: a short warm proof or a cool overnight proof. At my bakery, we switched to the overnight proof to work with our schedule, but either way works and it doesn’t affect the outcome.
→ Short warm proof: Set the mold in an electric bread proofer at 27°C for 5 to 8 hours. At this stage it needs to rise to fill the inside of the panettone mold by two-thirds.
→ Cool overnight proof: Transfer the mold to a cool place (16°C) for up to 12 hours, until it has risen to fill the inside of the panettone mold by two-thirds.
The process from start to finish
As a general overview, this is what the process looks like:
→ Create Danny Lievito, which takes about 10 days.
→ Establish a regular feeding schedule for Danny; you’ll feed it twice daily.
→ On the day you’re ready to start making panettone, feed Danny three times, in 3½-hour intervals.
→ Mix the first dough and let it ferment for 12 hours.
→ Mix the second dough and let it ferment for 2 hours.
→ Divide and shape the dough and let it proof for 5 to 8 hours.
→ Bake the panettone for 1 hour.
→ Let it hang for 8 to 12 hours before slicing and enjoying.
Making a lievito madre (aka Danny Lievito)
Makes one 240g batch
This is the starter we use to make panettone in the Christmas season, and we also use it year-round in laminated pastries, which keeps it fed and cared for when we’re not producing panettone. I start it with rye because the fiber in the flour helps kick-start fermentation faster than with white flour, which you’ll eventually switch to. (Start with whole wheat flour, if you can’t get hold of rye.)
Timing
About 10 days, one feeding on most days.
Equipment
Small bowl, medium container with lid (for proofing), stand mixer fitted with the dough hook.
Days 1 to 3

Today, Baby Danny will become stiffer, with the addition of flour but no water. In a stand mixer fitted with the dough hook, combine Baby Danny and the flour and mix well. Transfer it to a clean container, cover, and set aside at room temperature until it is doubled in bulk and bubbly, about 24 hours.
Day 5

In a stand mixer fitted with the dough hook, combine the Baby Danny, flour, and water and mix to form a homogenous dough. Transfer it to a clean container, cover it, and set aside at room temperature for 24 hours, until the next feeding.
Days 6 and 7
Repeat Day 5 ingredients and method.
Day 8
 Starting on Day 8 (and for Days 9 and 10), you’ll slightly decrease the hydration, from 45 per cent to 40 per cent. You’ll also start storing Danny in water, so be sure to squeeze out the excess water each subsequent day before feeding it new flour and water.
In a stand mixer fitted with the dough hook, combine the Baby Danny, flour, and water and mix to form a homogenous dough. Remove it from the mixer and roll it into a tight ball.
Transfer Danny to a clean container, which should be deep enough to fit the dough with room to expand above and below. What you don’t want is a too-large container that lets Danny bob around like an apple in a tub of water at a Halloween party.
Fill the container with 30°C water, enough to cover the dough. This warm water will give an initial boost to the yeast. The water will eventually cool, which is fine.
At this stage, you should start to notice Danny rising to the top of the water, within 3 or 4 hours of having been fed. That’s a clear sign that there is plenty of good, active, and healthy yeast in Danny.
Days 9 and 10
Repeat Day 8 ingredients and method.
Two-part daily storage feeding (keeping Danny happy, fed, and alive)
Now that your Danny Lievito has been well established, you can drop the “Baby” and switch to this twice-daily feeding routine that will keep it full of active, healthy yeast. Each day you’ll see that Danny has floated to the top of the water, showing that it’s fully alive. The part that’s outside the water will have formed a dry crust. When you remove the dough from the water and pull off the crust, it will reveal the soft starter underneath. After that, you will squeeze out the excess water before feeding.
Timing
Two feedings, 3 to 4 hours apart.
Equipment
Stand mixer fitted with the dough hook, container for holding Danny, electric bread proofer (or another means of keeping water at 30°C for 3 ½ hours).
Daily storage feeding: part one

Remove Danny from the water, pull off the dry crust, and squeeze out the water. In a stand mixer fitted with the dough hook, combine 100g of Danny with the flour and water and mix to form a homogenous dough that shows good resistance when pulled. Roll it into a rectangle, then into a tight spiral. Make a large crosswise score across the top. Discard the unfed starter (this is not the fully matured starter I suggest using for crackers and the like in Baking with Sourdough Discard).
Transfer the freshly fed mixture to a clean container, which should be large enough to fit the dough with some room to expand above and below, plus room for enough water to cover it. Fill the container with 30°C water, covering the dough. It’s important to keep the water at 30°C for the next 3 ½ hours, which you can do by continuing to replace it with fresh 30°C water, or by using an electric bread proofer, whatever suits you. Note that when you actually make the panettone, you will need a proofer, so you’ll want to think about getting one.
Danny should rise to the top of the water within 3 or 4 hours of having been fed, which is a clear sign of healthy yeast activity. After 3.5 hours, feed it again, as below:
Daily storage feeding: part two

Remove Danny from the water, pull off the dry crust, and squeeze out the water. In a stand mixer fitted with the dough hook, combine 100g of Danny with the flour and water and mix to form a homogenous dough that shows good resistance when pulled. Roll it into a tight ball. Discard the unfed starter.
Transfer the mixture to a clean container, which should be large enough to fit the dough with room to expand above and below, plus enough water to cover it. Fill the container with cool water (15°–18°C), covering the dough.
Transfer the container to a cool place (15°–18°C) for 20 hours.
Sugar bath, or bagnetto
This is a technique that I learned from the Italian bakers who have helped me make better panettone. Giving your Danny a 20-minute soak in a sugar bath, especially after it has been refrigerated for a week, is useful for sloughing off dead yeast and bacteria cells, and for eliminating some of the acetic acid that accumulated in the dough overnight, which, if excessive, can inhibit the growth of the yeasts that are essential to good fermentation.
Ingredients
1 litre tepid water (22°C)
5g sugar
In a large bowl or other container, combine the water and sugar, stirring until the sugar is dissolved.
Cut Danny into four pieces and use your hands to gently squeeze out the air bubbles. Transfer the pieces to the sugar bath and submerge them. Let them sit for 20 minutes.
Danny will sink at first but should float within 20 minutes. That’s an indication that it’s been “cleaned” by the sugar bath and is ready to be fed as per Real Talk: Managing Your Danny on a Schedule That Works for You.
If it doesn’t float after 20 minutes, feed it using the Two-Part Daily Storage Feeding and give it a sugar bath the following day.
If it floats after 20 minutes, you’re good. If it still doesn’t float after 20 minutes, repeat the same steps each day until you get it to float after 20 minutes.
Once you get the float, give it 3 days of the Two-Part Daily Storage Feeding before using it to make panettone.
Real talk: managing your Danny on a schedule that works for you, or, feeding Danny once per week, for people who aren’t total panettone maniacs and have normal lives
If you’ve made it this far, you’re more likely than not all in on panettone, but even total panettone maniacs may not be into the idea of feeding Danny twice a day every day.
So here’s some good news: when you’re not actively producing panettone, you can feed your Danny just once a week, using the following method:
Once per week Danny feeding
Remove Danny from the water, pull off the dry crust, and squeeze out the water. In a stand mixer fitted with the dough hook, combine 100g of Danny with the flour and water and mix to form a homogenous dough that shows good resistance when pulled. Roll it into a tight ball.
Transfer the mixture to a clean container, which should be large enough to fit the dough with room to expand above and below, plus enough water to cover it. Fill the container with cool water (15°–18°C), covering the dough.
Transfer the container to the refrigerator.
Every 7 days, pull it out of the fridge, give it a sugar bath (see Sugar Bath, or Bagnetto, at left), and then follow the Two-Part Daily Storage Feeding before returning it to the fridge for another week.
Three days before you want to make panettone, take Danny out of the fridge, give it a sugar bath, and put it on a regular feeding schedule using the Two-Part Daily Storage Feeding method for the next 3 days.
Three Danny Lievito feeds to actually start making the f***ing panettone already
This is it! You’ve established a healthy Danny, and now it’s time to embark on the true hero’s journey: making panettone. This is the time to switch from bread flour to panettone flour.
To promote maximum yeast development, it’s crucial to feed your Danny three times, at 3½-hour intervals, and keep it warm (30°C) between feedings.
The discarded portions of Danny from this next step are too valuable to be thrown away. Turn them into the crackers in the discard chapter. Save the discarded part from the third feeding to carry over; this is your new Danny.

Timing
Three feedings, 3 to 4 hours apart.
Equipment
Stand mixer fitted with the dough hook, container for holding Danny, electric bread proofer (or another means of holding dough and water at 30°C), pH meter.
First feeding
Remove Danny from the water, remove the dry crust, squeeze out the excess water, and transfer 200g of it to the bowl of a stand mixer fitted with the dough hook.
Add the flour and water and mix with the dough hook to form a homogenous dough that shows good resistance when pulled. Roll it into a tight ball.
Place Danny into a clean container large enough to hold at least triple the bulk of the dough. Cover it with 30°C water and place it in an electric bread proofer (at 30°C) for 3 to 4 hours, until the volume of Danny has roughly tripled in size, using your best visual estimate.
Note: While you’re waiting for the fermentation after the first feeding, use the time to make Citrus Paste and scale out all the ingredients needed for Classic Panettone: First Dough and Classic Panettone: Second Dough so that everything has time to chill and is ready to be added to the mixer. Store all the scaled ingredients in the fridge, clearly labeled for “first dough” and “second dough.”
Second feeding
When the dough has tripled, repeat the procedures from the first feeding (above), removing Danny from the water and squeezing out the excess, then mixing 200g of Danny with 200g flour and 80g water until the dough is homogenous and strong.
Roll Danny into a tight ball. Place it into a clean container large enough to hold at least triple the bulk of the dough. Cover it with 30°C water and place it in an electric bread proofer (at 30°C) for 3 to 4 hours, until the volume of Danny has tripled. Use a marker and tape to mark the top of Danny on the outside of the container. Then use your best visual estimate (or a ruler if you like) to mark subsequent levels that would indicate a tripling in volume.
Third feeding
When the dough has tripled, repeat the feeding procedures, removing Danny from the water and squeezing out the excess, then mixing 200g of Danny with 200g flour and 80g water until the dough is homogenous and strong.
Roll Danny into a tight ball again. Place it into a clean container large enough to hold at least triple the bulk of the dough. Cover it with 30°C water and place it in an electric bread proofer (at 30°C) for 3 to 4 hours, until the volume of Danny has tripled. Use a marker and tape to mark the top of Danny on the outside of the container. Then use your best visual estimate (or a ruler if you like) to mark subsequent levels that would indicate a tripling in volume.
Check the pH
At this stage, 3 to 4 hours after the third feeding, Danny is full of yeast and quite healthy. Use the pH meter to check the acidity, which should ideally be at 4.1 or 4.2. Once it’s tripled in size and has reached the desired acidity, it’s time to mix the first dough.
Citrus paste
Yield will vary, based on size of fruit
This citrus paste is one of the ingredients for the second dough. It doesn’t taste amazing on its own, but in combination with the sweet, rich, buttery dough, it provides a great balance. This recipe makes more than you will need for one loaf, but you can refrigerate it if you’re baking again within a few days, or freeze it if you’re not going to bake again for a week or longer. I use a minimum of two oranges and two lemons, because the blender won’t properly puree a smaller amount of fruit.
Choose oranges and lemons with thin, unblemished skins and fruits that are heavy for their size, which indicates juiciness. If you can’t get unwaxed, organic citrus, gently wash the skins before zesting the fruits or cooking them into a puree.
Timing
45 minutes total.
Equipment
Paring knife (for microwave method), microwave oven and microwave-safe bowl large enough to hold fruit (for microwave method), roasting pan (for oven method), blender or food processor, storage container
Ingredients
2 oranges, rinsed well in warm water
2 lemons, rinsed well in warm water
Cook the citrus
Microwave method: Make a few small cuts with a paring knife in each piece of fruit to keep it from exploding in the microwave. Place the fruit in a large microwave-safe bowl or other container, loosely covered with plastic wrap or a lid left ajar. Microwave on full power for 15 minutes.
The fruit should be uniformly very soft all over. If it still has any firm-feeling spots, return it to the microwave for 1- to 2-minute intervals, until it is all very soft.
Oven method: Preheat the oven to 80°C. Arrange the fruit in the roasting pan and cover with the lid or foil. Roast for 1 hour, until the fruit is very soft all over.
Make the citrus paste
Let the fruit cool for 15 to 20 minutes.
Cut the fruit into quarters, so it’s easier to blend, then transfer it to a blender or food processor and puree until it is a coarse paste. It shouldn’t be totally smooth. You might need to add a little water to get the blender going. Transfer the mixture to a clean, shallow container and refrigerate it to cool completely.

Richard Hart Bread (Hardie Grant, $55) is available from good booksellers and online now; follow his adventures at @richardhartbaker, @hartbageri and @greenrhino_mx.